After Purchase File Prep

Getting Your Edge Design Ready For Print

Once checkout is complete, use the processed file from your Projects dashboard. This guide explains which file to download, how to review it, when to use Vellum, and what to confirm before submitting your book to a print-on-demand provider.

Open Projects Open PDF Validator Back to Learn Hub

Final PDF Projects

Download the processed file and upload it as the interior PDF for your chosen printer.

Vellum Templates

Keep the downloaded filename unchanged, then import the file into Vellum as a page border.

Final Checks

Validate the finished PDF, confirm bleed and color settings, and order a physical proof copy.

1

Download The Correct File

Your finished production file lives in Projects after checkout. Open the purchased project and look for the Available Downloads area.

  • Use Final PDF (Processed PDF) for production. This is the file with the edge design embedded into the PDF.
  • Use the same account that purchased the project so the paid download is available in your profile workspace.
  • Save the downloaded file somewhere easy to find before moving into Vellum or your printer upload workflow.
Do not upload review files.

Watermarked proofs and edge preview PDFs are helpful for checking the design, but they are not the final production upload.
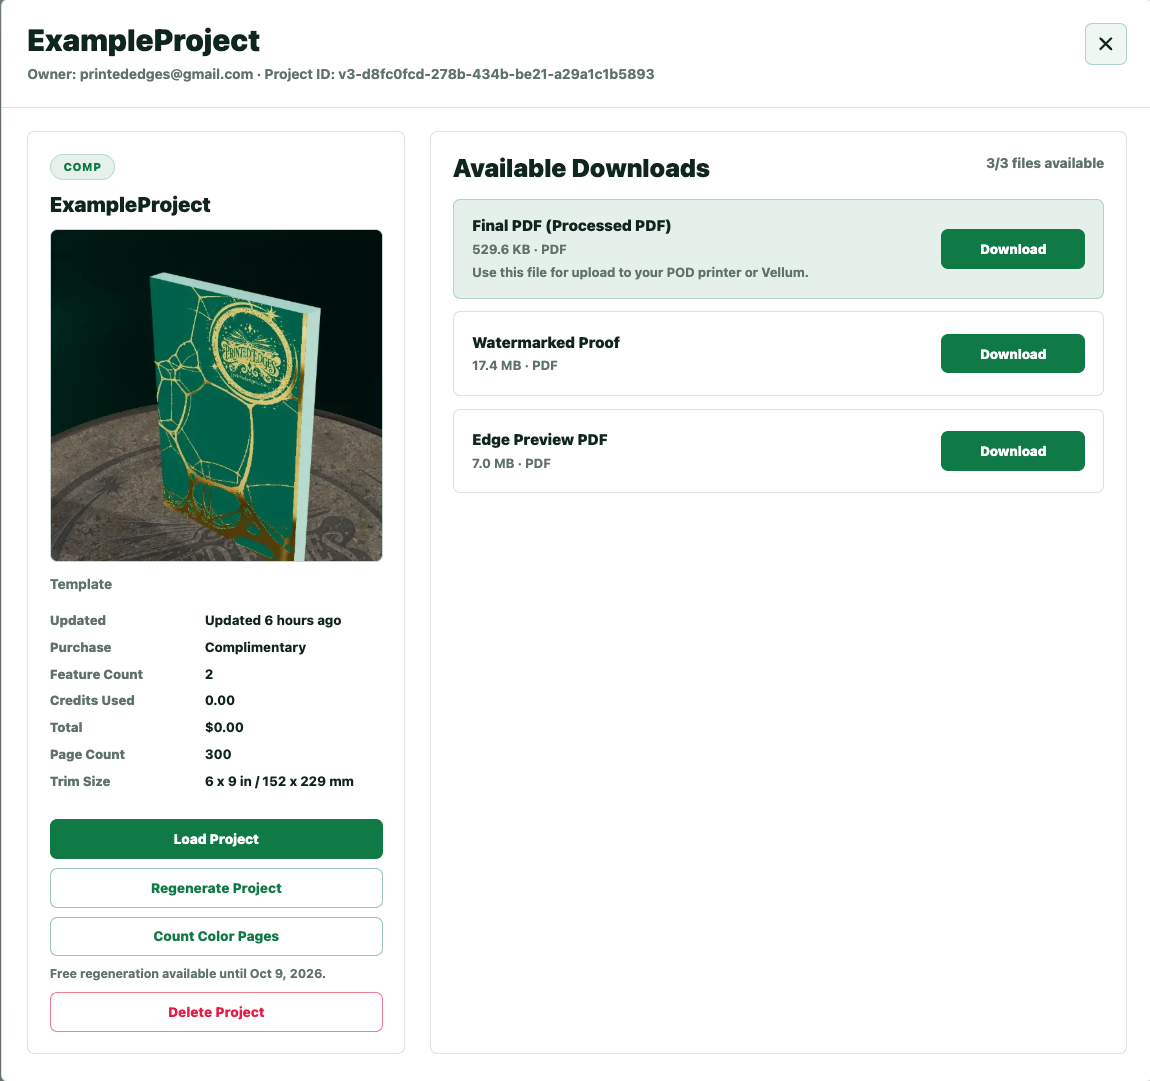

PrintedEdges project detail modal showing the available downloads list
Open the purchased project from Projects, then use the Available Downloads area to find the production file.
Final PDF processed PDF download row in the project detail modal
The Final PDF (Processed PDF) row is the file to upload to your printer or into Vellum. The proof and edge-preview files are for review only.
2

Review The Processed PDF

Open the downloaded PDF before using it anywhere else. A short review here prevents many printer upload errors later.

Book Specs

Confirm the trim size, page count, and bleed expectations match the project you plan to print. The final PDF trim size will include the required bleed margins on either three or four sides of the PDF, depending on your printer requirements.

Interior Safety

Check that edge artwork does not cover page numbers, headers, footers, chapter headings, or important outside-edge content.

Design Output

Confirm the artwork appears in the expected direction and that any colored edge design still looks correct in the PDF.

Stop If It Looks Wrong

If the file does not match the project settings, regenerate or contact support before uploading it to Vellum or a printer.

3

Vellum Template Workflow

Use this workflow for Vellum Template, Free, and Vellum-template multibook projects.
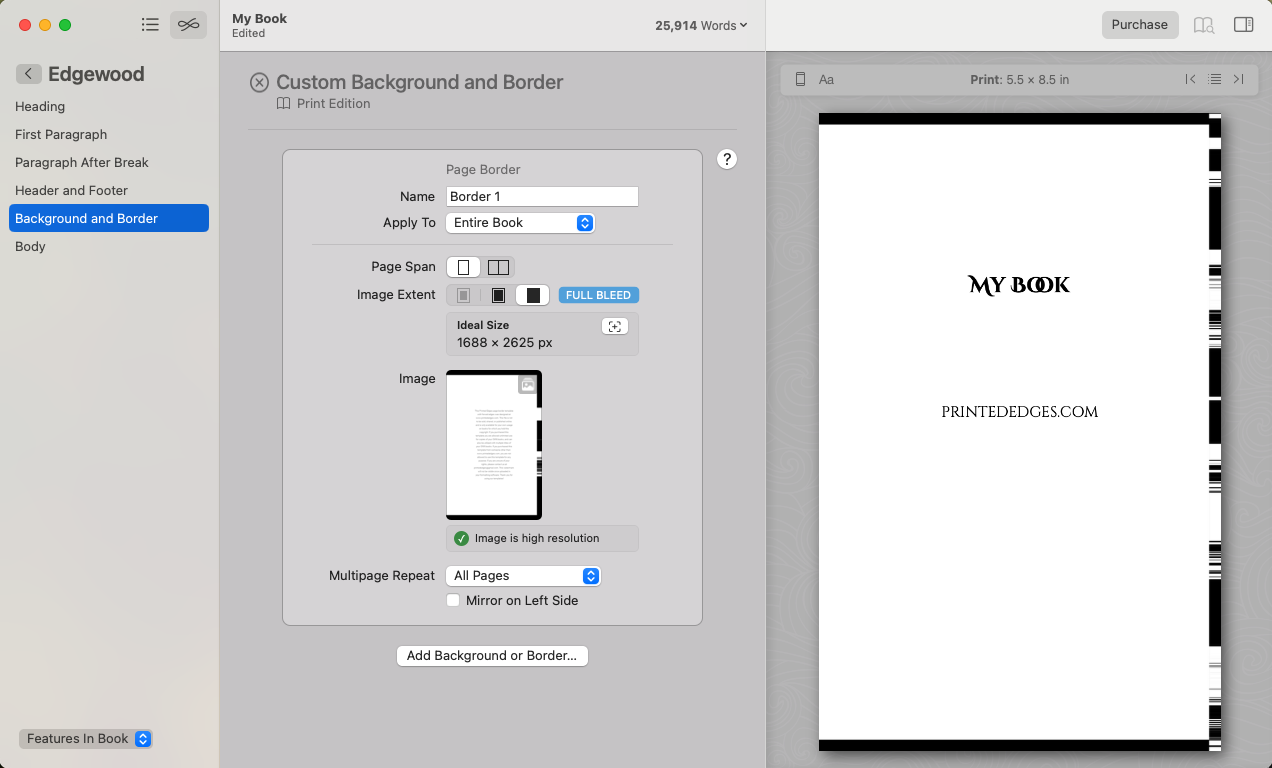
  • Open your existing book project in Vellum.
  • Go to the book style controls and open Background and Border.
  • Add or edit a custom Page Border.
  • Drag or upload the unchanged Final PDF (Processed PDF) into the page border image/source field.
  • Set Apply To to Entire Book.
  • Set Multipage Repeat to All Pages.
  • Switch the Vellum previewer to Print, inspect the edge artwork, and make sure your print setup uses Color or Black and White based on your design before exporting from Vellum.
Vellum Background and Border settings with a PrintedEdges page border applied
Use Vellum's Background and Border settings to apply the processed PDF as a full-bleed page border across the entire book.
Keep the original filename.

Do not rename a downloaded Vellum template PDF before importing it into Vellum. PrintedEdges adds the -vim-apb-rpa-exb filename suffix so Vellum can read the import settings correctly.

4

Direct PDF And POD Printer Uploads

Use this workflow for Final PDF, Omnibus, Double Sided, and print-ready PDF multibook projects.

  • Set up your book in the printer platform with the same trim size and page count used in PrintedEdges.
  • Make sure the printer project is configured for full bleed. Edge designs require the correct bleed margins to print and trim correctly.
  • Choose the printer's color interior or color printing option if your PDF uses colored edge artwork or colored interior content.
  • Upload Final PDF (Processed PDF) as the interior file, then review the printer's digital proof before ordering.
Printer settings matter.

If the printer reports a trim, bleed, margin, color, or page-count error, stop and compare the printer setup to your PrintedEdges project before re-uploading.

5

Validate Again Before Submitting

The PDF Validator is a final preflight check for finished files. Use it before submitting to print, and use it again after any file changes.

  • Validate the processed PDF after downloading it from Projects.
  • Validate again if you edited the PDF, re-exported from Vellum, changed page count, adjusted bleed, or made any printer-prep changes.
  • Review trim size, page count, bleed, and edge setup before sending the file to production.
  • If validation flags an issue, fix the source file or regenerate the PrintedEdges project before uploading to your printer.
Open PDF Validator
6

Multibook And Series Projects

Series projects need one more organization pass before files move into Vellum or a printer dashboard.

  • Keep each downloaded file with its original filename.
  • Match each file to the correct book name, trim size, and page count.
  • For Vellum-template multibooks, repeat the Vellum import workflow for each matching book.
  • For print-ready PDF multibooks, confirm every processed file or bundle belongs to the correct title before upload.
  • Avoid swapping files between books unless the books intentionally share the same trim, page count, and edge design.
7

Order A Physical Proof Copy

Digital previews help, but they cannot fully predict paper stock, trimming, binding alignment, or printer color handling. PrintedEdges.com is not liable for damaged or misprinted projects from printers, especially when a proof copy was not purchased first.

  • Order one physical proof copy before ordering in quantity.
  • Review edge alignment, trimming, page order, color consistency, and any page numbers or headers near the edge.
  • If something looks wrong, take photos and screenshots before changing files or printer settings.
  • Printer quality varies. We recommend IngramSpark and BookVault for the best prints, but the technique should work at all printers with varying success depending on your design.
  • If the proof copy looks correct, you can move forward with the final order.
Need changes after a proof?

If you need to make any changes to the design after getting a proof copy, you can regenerate your project from the project page for free within the first 90 days.

8

Common Issues To Check First

If something does not behave as expected, these checks usually identify the next step.

Download Is Locked

Confirm the project was purchased and that you are signed in with the same account used at checkout.

Wrong File Opened

Make sure you downloaded Final PDF (Processed PDF), not the watermarked proof or edge preview PDF.

Vellum Import Fails

Re-download the file and import it with the original filename, including the Vellum suffix.

Printer Rejects Upload

Compare trim size, page count, full bleed, color settings, and the printer error message before trying again.

Still have questions?

Email printededges@gmail.com with any questions or concerns. We have seen most issues before and can usually point you toward the next fix.

Need Help?

Send The Details Before Reworking The File

If your processed file, Vellum import, validator result, printer upload, or physical proof does not look right, send support the project name, printer or software you are using, screenshots, and photos of any physical proof issue.

Contact Support Troubleshooting

After your proof copy arrives, tag PrintedEdges if you share your design online or send finished-book photos to printededges@gmail.com for possible gallery inclusion.